Monday, October 22, 2018

Printing Process

Image result for relief printing example


Relief Printing is the method of printing that consists of cutting or etching a printing surface. First, the artist will take a wood block and place a toning primer over the surface. Next, the drawing can be transferred onto the wood block by using an iron oxide or carbon transfer paper. After that, you decide what assets of the image you want to emphasize, or darken. You will use different sized tools to add different depth to the image. After completing this step, the image is ready to be printed. Black ink is rolled over the top of the image and then a baren is used to transfer this image onto a thin sheet of paper.


__________________________________________________________________________________________


Related image
Intaglio printing is describe as the opposite of relief printing, in that the printing is done from ink below the surface of the plate. The ink is rubbed into the indentions then, the printing surface is wiped clean. To start this process, a tool called a roulette is used to start adding dimensions to the artwork. The purpose of this is to use different patterns and a variety of tone into the picture. Etching involves having to have lots of polishing and cleaning to the surface. Next you would need to apply a "ground" onto the image. Once it has been prepared with a ground, the smoking process begins. Where the coal is absorbed onto the image. Next, you will scratch at the all black surface to reveal the underlaying copper. The copper parts will be actually transferred onto your final result. After carving the image, you will begin a process called "etching". This process eats away at the bare copper revealed through the coal. Now, you image is ready to be printed. Ink is evenly distributed, and then a dampened sheet of paper Is placed on top of the image. The last step is that it is ran through the press with high pressure.


_______________________________________________________________________


Related image
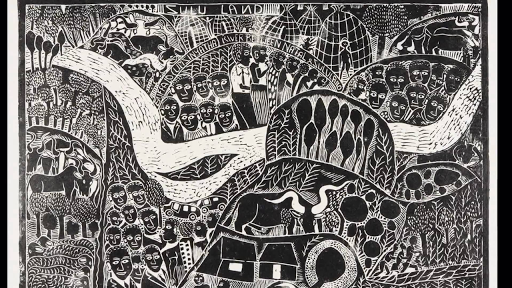
Lithography Printing  

is the printing process based off of the root word "lithos" meaning stone. This method is using the immiscibility of water and oil. First, the artist must use a greasy substance to draw the image on the lithographic stone. Next, the stone is chemically treated to establish the areas where water goes. One the drawing is established into the stone, you can replace the oil with any preferred color of ink. Other materials such as greasy pencils and crayons are used to create dimension and depth into the drawing. These materials are numbered, and the higher the number the more grease they contain. The greasier the utensil the harsher the line will become. This can be removed by taking this like razor blades or sand paper to remove the grease. Next you apply Gum Arabic to establish the whites in the image. After this you wash the image with lithotine. 
________________________________________________________________

Reflection 

In conclusion, my favorite printing method is relief printing. This is due to the fact that this is the method that makes the most amount of logical sense to me. I also feel like this method is the simplest and I would do exceptionally well with it.


Thursday, October 11, 2018

Personal Narrative Panorama 

For Spring Break of 2018, my family and I decided to take a vacation to Gulf Shores, Alabama. It is located on a beautiful beach bordering Florida. We decided to take this vacation because they offered many handicap accessible things that allowed my disabled sister to have fun on this excursion as well.

While I was there, I made sure to capture as much as I could. I personally find traveling so inspiring and interesting to see a different lifestyle. We spent some time at the beach, the environment there was absolutely beautiful. I also took advantage of the beautiful scenery at a place we visited called Alligator Alley. It consisted of stunning trees and greenery, very contrasted from the beach. I also visited a dolphin boat tour which was absolutely unreal.

Overall, I loved visiting Gulf Shores. It wasn't a too high profile spring break location so I didn't feel overcrowded. It was a nice and relaxing weekend and I thoroughly enjoyed it. My family and I are planning to visit again next summer so it'll be warmer and we will be able to take advantage of the beach. I loved that my sister got to be included in this, I could tell she really enjoyed this trip.

Reflection

I enjoyed being able to go back to these amazing memories and combine various images to create one image to capture the whole feeling of the trip. I included aspects from every part of the vacation. I even overlaid water and rock textures in the sky. I also overlaid greenery from the Alligator Alley, and added alligator skin over the building. I took advantage of the quick selection tool in this panorama, as well as the shortcut command J. Overall, I feel much more confident using photoshop.

Monday, October 1, 2018

Pop Art

We were assigned to take a photoshoot of an assigned partner, and transform them into a pop art inspired look. My partner was John Wallace, a unique boy one might say. From the photoshoot I made sure to get various shots in different positions. The first step I took was cutting John out of the picture using the quick selection tool, and using the shortcut command e to bring him to his own layer. Next I changed the background to a city scape, much more exciting than the Olathe Northwest Court yard. I was inspired by Warhol Arts repetitive imagery, his spontanious shapes, and his playful outlines. I used a variety of warm and cool tones to enhance the undertones in the background image. The combination of the inspiration Warhol Arts gave me with the personality of John Wallace complimented each other perfectly for pop art.

Video Final Blog Post Short Film Click here to watch my short film! This process took about 4 weeks to do including Pre-Productio...